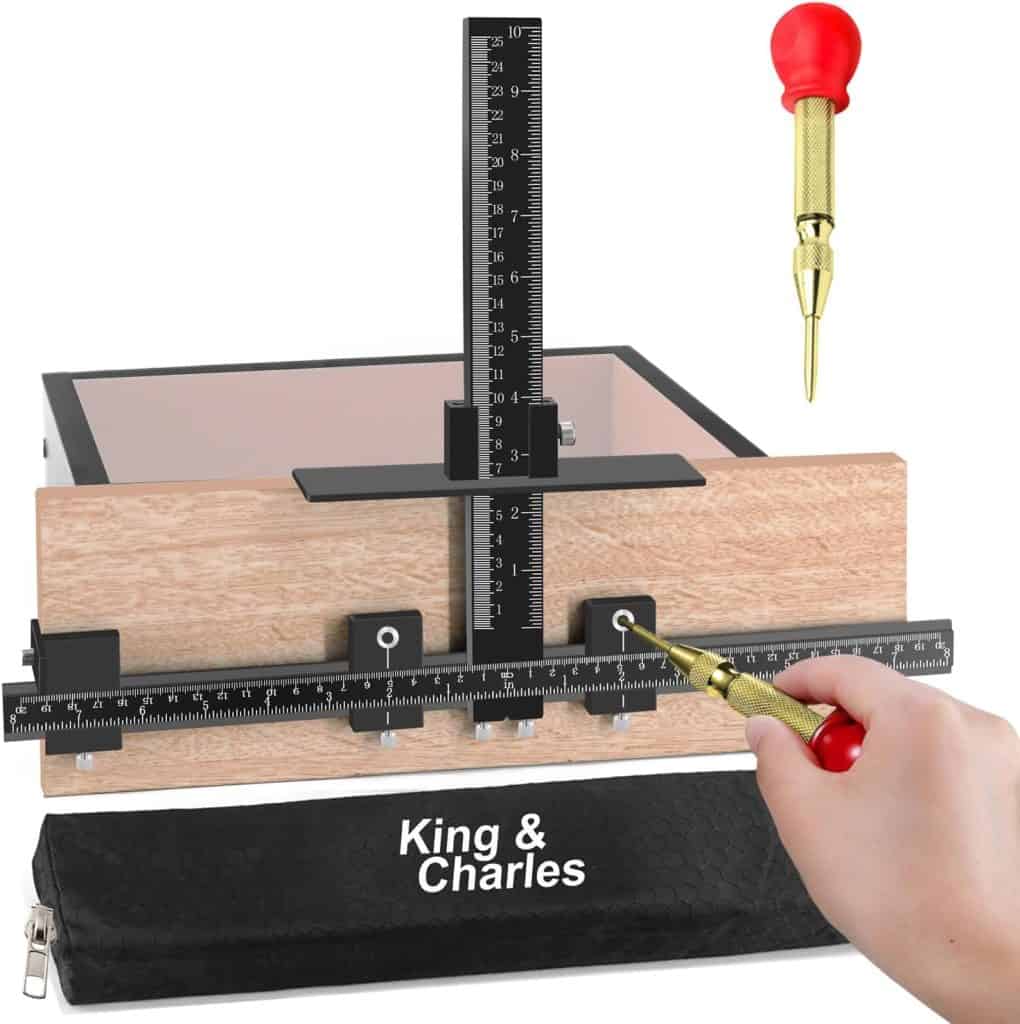
Best Cabinet Hardware Jig
The two-hole mistake you only make once
You mark your pull, drill the first hole, and everything feels fine.
Then the second hole is off by just a hair… and the handle sits crooked forever unless you plug, sand, and repaint. A cabinet hardware jig is basically cheap insurance against that moment.
This page helps you choose the right cabinet hardware jig for DIY and woodworking in 2026—fast picks first, then the stuff that actually prevents blowouts, crooked pulls, and “why doesn’t this line up?” installs.
Disclosure: This page may include affiliate links. If you buy through a link, the site may earn a commission at no extra cost to you.
Best Cabinet Hardware Jig (2026): Top Picks
| Image | Product | Best for | Key feature | View on Amazon |
|---|---|---|---|---|
 | Kreg Cabinet Hardware Jig | Most DIY installs | Edge registration, adjustable spacing, common pull centers | View on Amazon |
 | True Position Tools Cabinet Hardware Jig | High accuracy + repeat work | Rigid build, precise adjustments, clean referencing | View on Amazon |
 | Milescraft CabinetJig | Beginners on a budget | Simple layout, adjustable stops, common hole spacing | View on Amazon |
 | Rockler Drawer Pull / Hardware Jig | Wide drawers + longer pulls | Stable registration, helpful indexing for symmetry | View on Amazon |
 | Massca Aluminum Cabinet Hardware Jig | Durability + value | Aluminum body, repeatable adjustments, common spacing | View on Amazon |
Pro tip: Most cabinet pulls are sized by center-to-center hole spacing, like 3″ (76 mm), 3-3/4″ (96 mm), and 5″ (128 mm). Make sure your jig comfortably covers the sizes you actually bought.
1) Kreg Cabinet Hardware Jig — Best overall for most DIY installs

Best for: First-time installs that still need to look pro—doors, drawers, knobs, and pulls.
Why it’s good: Straightforward edge registration + repeatable settings make it hard to “invent” new hole locations by accident.
Tradeoffs: Like any jig, it can slip if you get lazy with clamping—especially on slick painted doors.
Who should skip it: If you’re doing production-level installs every week and want heavier, ultra-precise hardware.
🧐 Pro tip: Clamp a thin scrap “fence” to the door edge and register the jig against that. It keeps your reference consistent door-to-door.
| Pros ✅ | Cons ⚠️ |
|---|---|
| ✅ Fast to set up for common knob/pull layouts ✅ Repeatable once you lock in your offsets ✅ Great “first jig” learning curve | ⚠️ Needs solid clamping to prevent drift ⚠️ Measure twice when switching from doors to drawers. |
Pro tip: Mark your “reference edge” on painter’s tape (TOP / HINGE SIDE). That one step prevents mirrored installs.
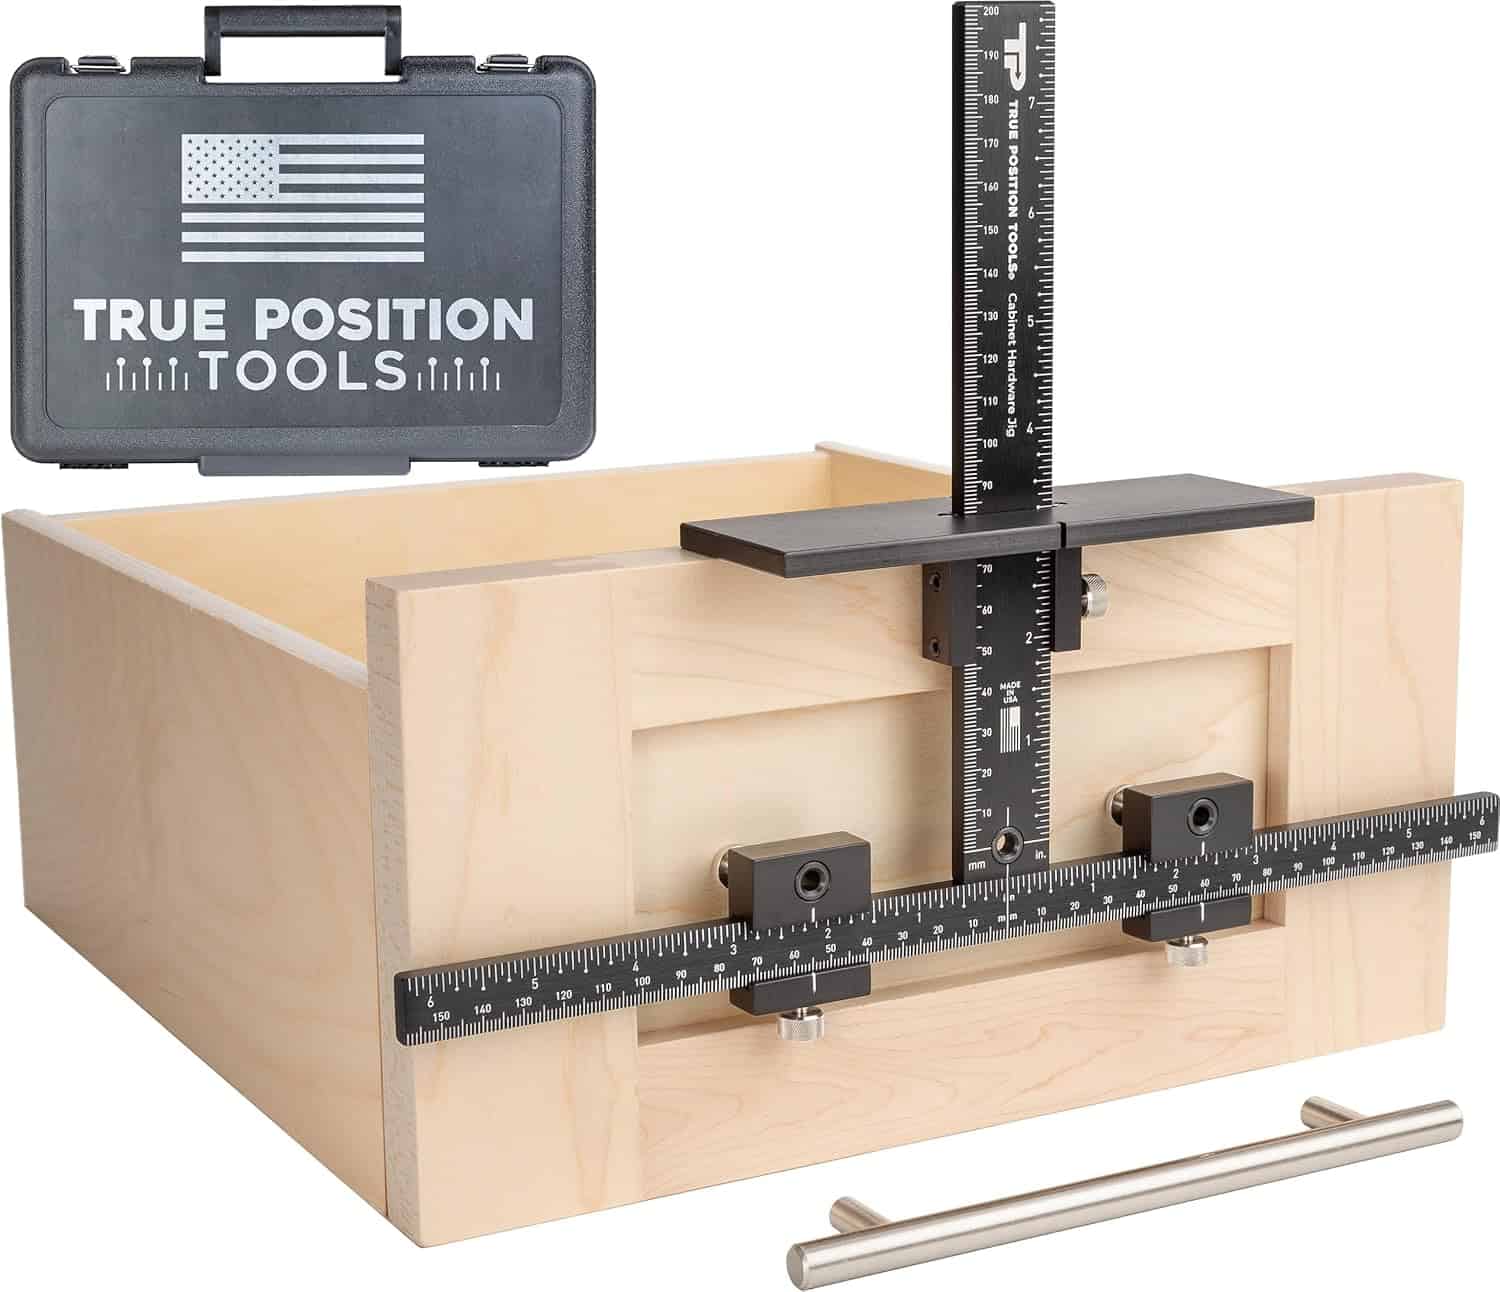
2) True Position Tools Cabinet Hardware Jig — Best for high-accuracy, repeat installs
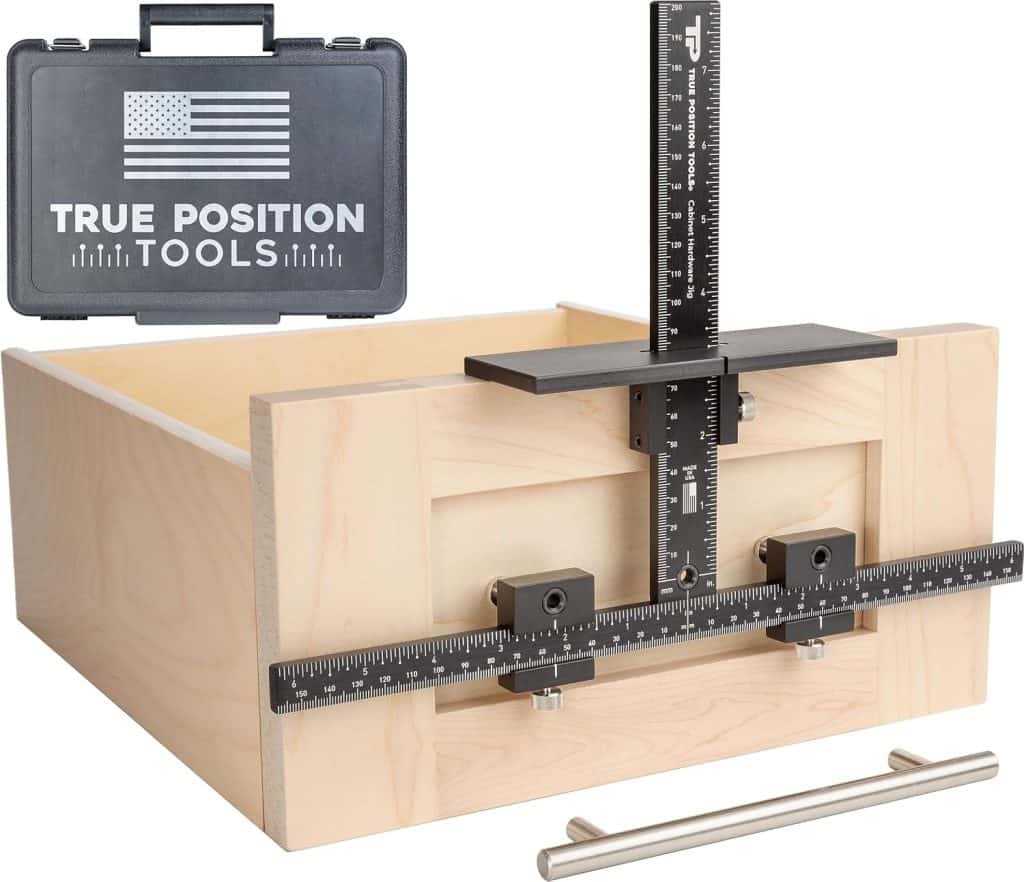
Best for: Whole-kitchen installs and anyone who wants “set it and repeat it” accuracy.
Why it’s good: Rigid build and more precise adjustment feel. When a jig doesn’t flex, your holes don’t “wander” under pressure.
Tradeoffs: More tool than you need for a one-off bathroom vanity.
Who should skip it: If you only install hardware once every few years and want the simplest setup possible.
Pro tip: Batch your doors by size, then drill all matching doors without changing the jig setting. Fewer adjustments = fewer mistakes.
| Pros ✅ | Cons ⚠️ |
|---|---|
| ✅ Very repeatable for big installs ✅ Rigid feel helps keep holes consistent ✅ Great when you care about symmetry across many drawers | ⚠️Overkill for occasional DIY ⚠️Still requires careful referencing on every door/drawer |
Pro tip: For painted doors, put a strip of painter’s tape where you’ll drill. It reduces chip-out and makes your pencil marks easier to see.
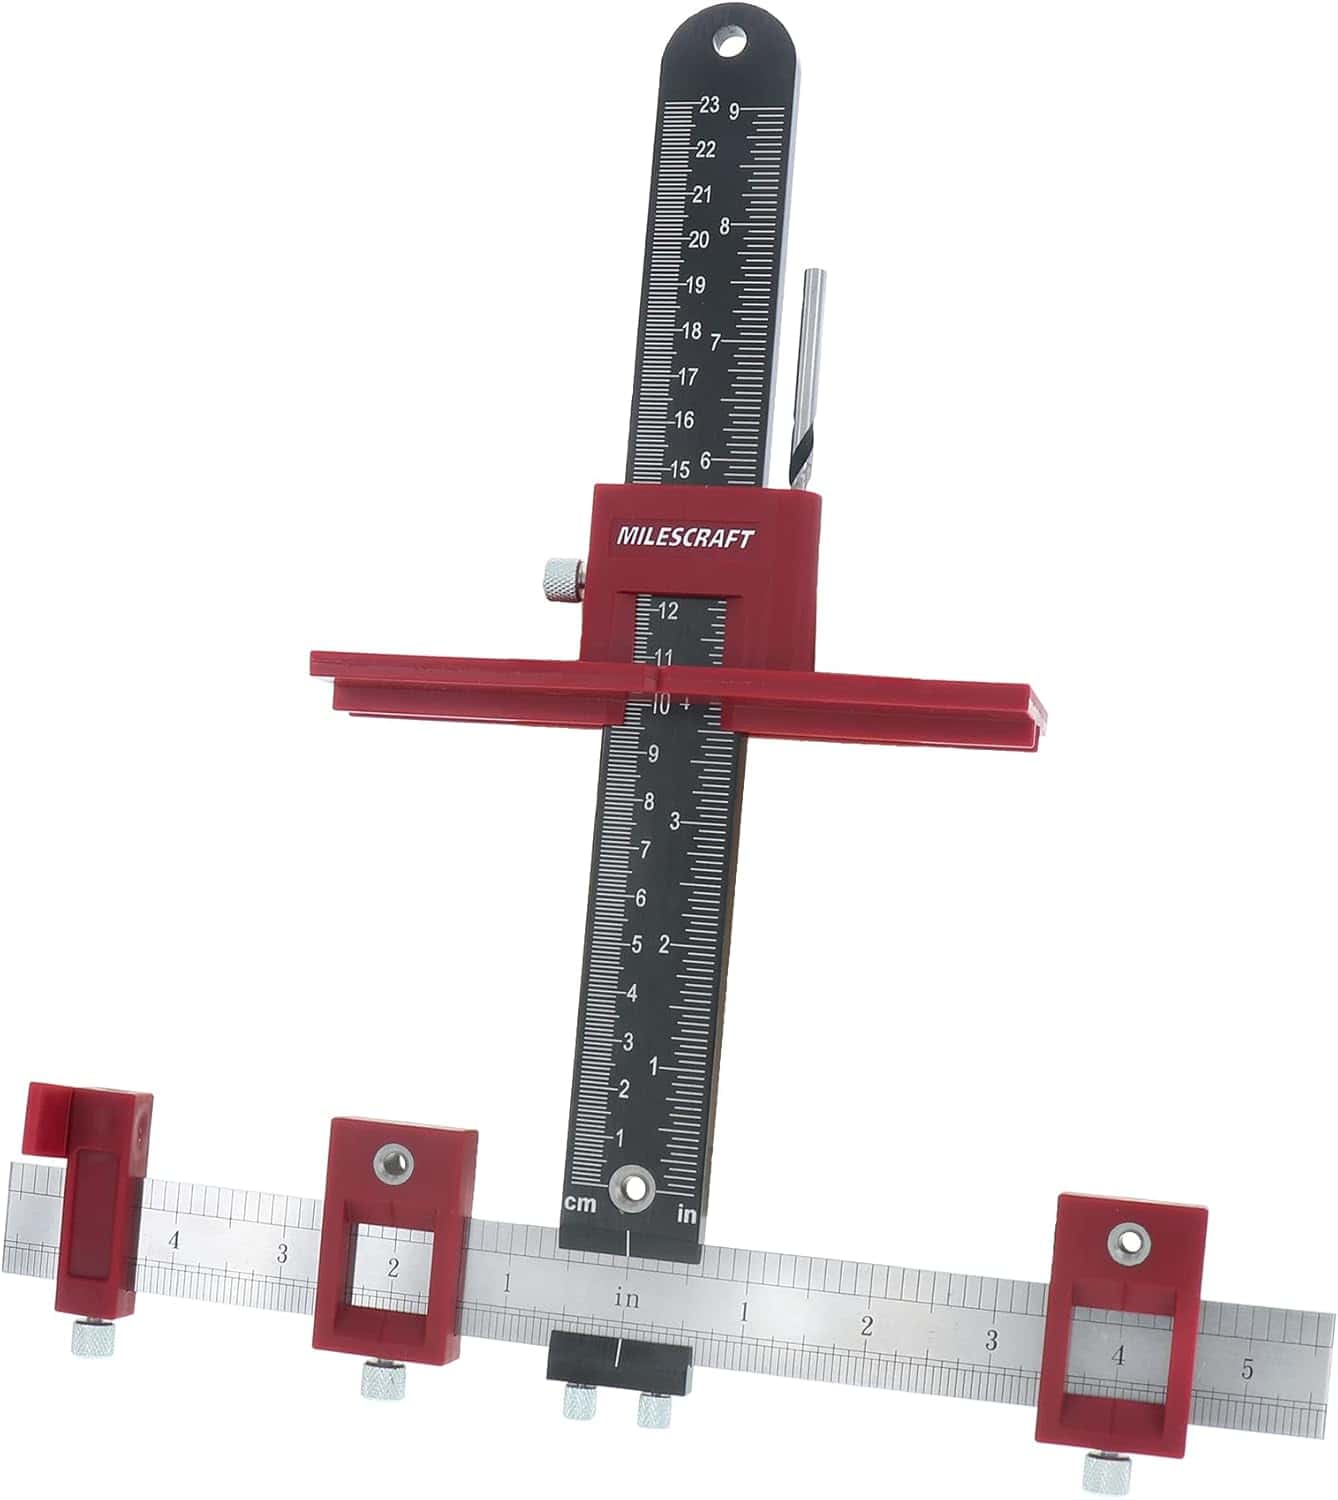
3) Milescraft CabinetJig — Best budget-friendly starter jig

Best for: Beginners who want straight, consistent holes without spending premium money.
Why it’s good: Gets you into the “jig workflow” (reference, clamp, drill, repeat) without a complicated setup.
Tradeoffs: Lighter jigs demand better technique. If you push hard, any flex shows up as hole drift.
Who should skip it: If you know you’ll install hardware often and want a more rigid, long-term tool.
Pro tip: Don’t “free-hand clamp” with your fingers. Use a real clamp and snug it like you mean it.
| Pros ✅ | Cons ⚠️ |
|---|---|
| ✅ Beginner-friendly and easy to understand ✅ Good improvement over measuring each door from scratch ✅Works well when you clamp properly | ⚠️Less rigid than premium jigs ⚠️Technique matters more (light pressure, sharp bit) |
Pro tip: Start the hole slow for the first second, then speed up. Most “walking” happens right at the start.
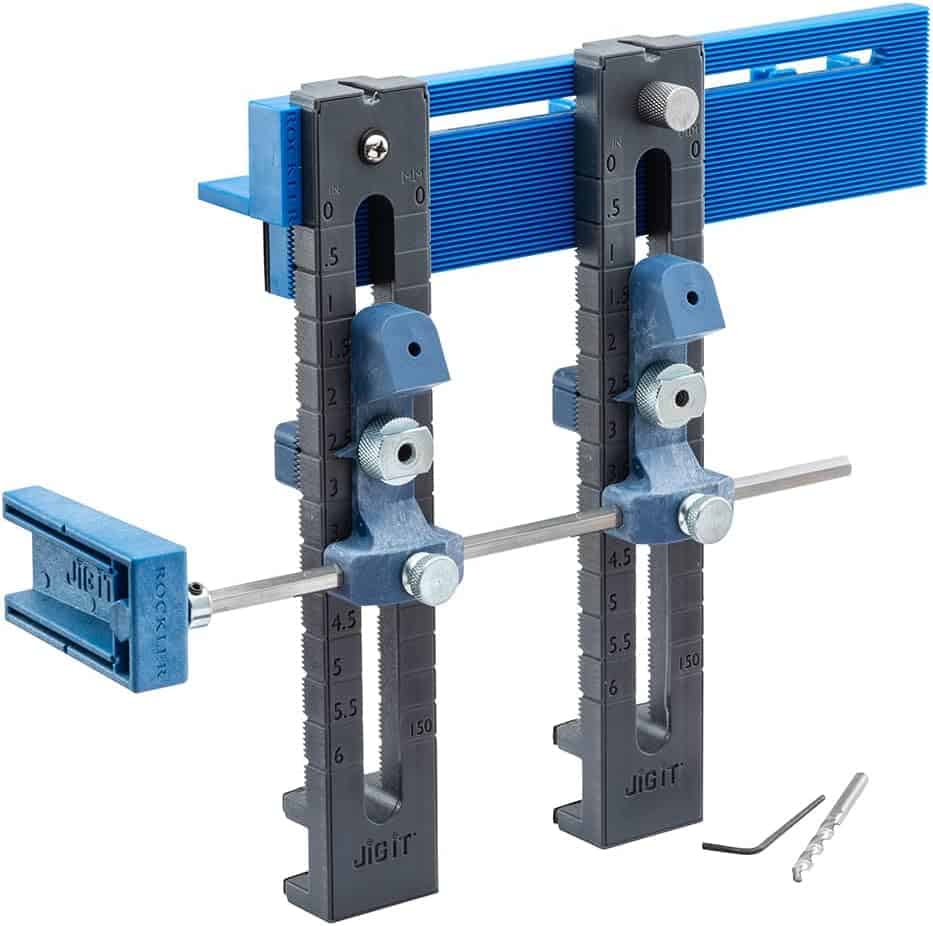
4) Rockler Drawer Pull / Hardware Jig — Best for long pulls and wide drawers
Best for: Centering pulls on wide drawer fronts and keeping long handles straight across a full run.
Why it’s good: Good registration and indexing helps when “centered” actually matters (big drawers show crooked hardware fast).
Tradeoffs: Can take a little more setup time when you switch between doors and drawers.
Who should skip it: If your project is mostly small knobs and you want the simplest, fastest jig possible.
Pro tip: Use a centerline on the drawer front (light pencil on tape) and set the jig to that line. Symmetry beats “eyeballing” every time.
| Pros ✅ | Cons⚠️ |
|---|---|
| ✅ Great for centering and repeat installs on drawers ✅ Helps keep long pulls aligned across multiple fronts ✅ Nice when you’re doing a lot of hardware in one go | ⚠️More “setup” than the simplest door-only jigs ⚠️Still needs clamps to avoid slip |
Pro tip: If you’re installing pulls on slab doors, verify your offset on one door, then lock it and don’t touch it until the whole batch is drilled.
5) Massca Aluminum Cabinet Hardware Jig — Best midrange “buy once” durability
Best for: DIYers and woodworkers who want a sturdy jig that won’t feel flimsy after a few projects.
Why it’s good: Aluminum body tends to hold settings well and resists the “sloppy feel” that can show up with lighter tools over time.
Tradeoffs: You still need to set it correctly. A rugged jig won’t save a mirrored layout or a wrong reference edge.
Who should skip it: If you’re only installing a couple knobs and never plan to use it again.
Pro tip: Use an awl to dimple the drill point before drilling. A tiny dimple keeps the bit from skating on slick finishes.
| Pros ✅ | Cons ⚠️ |
|---|---|
| ✅ Durable feel for repeat projects ✅Good choice when you want a “buy once” tool ✅ Works well for doors and drawers with consistent settings | ⚠️More tool than you need for a one-off job ⚠️Clamping and referencing still matter |
Pro tip: Drill a small pilot first (then the final clearance size) on delicate finishes. Two-step drilling chips less than “full size” from the start.
How We Choose
We don’t recommend jigs based on hype. For cabinet hardware, the “best” jig is the one that stays registered, drills square, and repeats without drama.
- Registration: How the jig references the door/drawer edge so it doesn’t drift
- Repeatability: Does it return to the same hole location after you move it?
- Adjustment sanity: Easy to set common offsets and pull spacing without “math fights”
- Clamp reality: If it’s awkward to clamp, people don’t clamp… and holes wander
- Beginner friendliness: Clear reference points so you don’t mirror/flip the layout by accident
Pro tip: The jig is only half the system. Sharp bits + solid clamping make the other half.
Buyer’s Guide: What to Look For (and How to Use It Right)
1) Registration is everything
The best jig is the one that references the same edge every single time. If the jig can rock, slide, or “float,” your holes will drift.
- Doors: Decide if your reference is the top edge or bottom edge and stick with it.
- Drawers: Decide if you’re centering to the drawer or matching a consistent offset from the top edge.
Pro tip: Put “TOP” on painter’s tape for every door before you start drilling. If you flip one door mid-stream, you’ll feel it in your soul.
2) Make sure it fits your pull spacing
Most pulls are measured center-to-center: 3″ (76 mm), 3-3/4″ (96 mm), 5″ (128 mm), and longer sizes for big drawers. A jig should cover your hardware sizes without awkward “almost fits” settings.
Pro tip: Measure the pull you bought with a tape or calipers anyway. Packaging is usually right… until it isn’t.
3) Bit choice: stop fighting the drill
A sharp bit that starts cleanly makes your jig feel more accurate. For hinge plates and some hardware workflows, self-centering bits can make alignment easier too.
If you’re upgrading one thing for cleaner starts, look here: Best Self Centering Drill Bit Set
Pro tip: Back up the exit side with a sacrificial board tight to the door. Blowout happens when the bit exits into air.
4) A simple workflow that works (doors + drawers)
- Decide your layout (offset and pull orientation).
- Set the jig once and drill a test piece.
- Clamp the jig (don’t hand-hold it).
- Start slow, then drill through with steady pressure.
- Repeat without changing settings until the batch is done.
Pro tip: If you’re drilling painted MDF doors, a brad-point bit helps reduce skating and chipping—especially on the entry side.
5) Common spacing + pilot holes (practical numbers)
For typical cabinet knob/pull screws, a pilot hole in the neighborhood of 3/32″ (2.4 mm) is common in hardwoods, and slightly larger can help in MDF. Always test on scrap because screw threads vary.
Pro tip: If a screw feels like it’s taking real force to drive, stop and widen the pilot a hair. Snapped screws are a bad time.
Don’t Buy the Wrong One If…
- You refuse to clamp. Any jig can slip, and one slip ruins alignment.
- Your pulls are an odd center-to-center size and you’re assuming “all jigs fit all pulls.” Verify first.
- You’re swapping between doors and drawers constantly and hate re-setting tools. Pick a jig known for repeatable, easy adjustments.
- You want perfect symmetry but you’re not willing to mark a centerline. Centering requires a reference line.
- You’re drilling brittle finishes (paint, melamine) and you plan to drill full speed from the start. That’s how chipping happens.
Pro tip: If you mess up one door, don’t “push through.” Stop and re-check your reference edge and spacing before you drill the next ten.
FAQs
What’s the best cabinet hardware jig for beginners?
Look for a jig with clear edge registration and simple, repeatable adjustments. For most beginners, a straightforward “set, clamp, drill, repeat” jig is the fastest path to clean installs.
Do cabinet hardware jigs work on both knobs and pulls?
Yes. Knobs are typically one hole, pulls are two holes (measured center-to-center). The jig needs to handle both single-hole placement and common pull spacing.
What pull spacings should a jig cover?
The common ones you’ll run into are 3″ (76 mm), 3-3/4″ (96 mm), and 5″ (128 mm), plus longer sizes on wide drawers. Match the jig’s range to your actual hardware.
How do I keep the jig from slipping while drilling?
Clamp it. If the surface is slick, add painter’s tape or a thin non-slip pad where the jig contacts the door. Start the hole slowly so the bit doesn’t “grab” and yank the jig.
Do I need a self-centering drill bit for cabinet hardware?
Not always for knobs/pulls, but self-centering bits are handy for hinge plates and some alignment tasks. If you’re doing hinge work too, they can make life easier
How do I prevent chipping on painted or MDF doors?
Use painter’s tape, start slow, and back up the exit side with a sacrificial board. A sharp brad-point bit also helps the hole start cleaner.
Can one jig handle both face-frame and frameless cabinets?
Yes—because the jig references the door/drawer, not the cabinet box. Just keep your reference edge consistent and verify your offset on a test piece before you drill the whole run.
What pilot hole size should I use for hardware screws?
It depends on the screw and the door material. A pilot around 3/32″ (2.4 mm) is common for many wood screws in hardwood, but always test on scrap first—especially in MDF.
A Couple Helpful Next Steps
If you’re doing hinges in the same project, this walkthrough pairs well with hardware installs: /how-to-drill-cabinet-hinges/ (Coming soon)
For more cabinet jig options (and the jigs that solve other cabinet problems), browse here: Cabinet Jigs hub
Pro tip: Write down your final offset and pull spacing on a sticky note and slap it inside a drawer. Future-you will thank you when one handle loosens a year later.
Conclusion: Which One Should You Choose?
If you want one jig that covers most DIY installs cleanly, start with the Kreg-style pick. If you’re doing a bigger run and want a more rigid, high-accuracy feel, step up to the True Position Tools option. On a tighter budget, the Milescraft style works well when you clamp properly and drill carefully. If you’re focused on wide drawers and long pulls, the Rockler-style pick earns its spot. And if you want a sturdy “buy once” jig with an aluminum body, the Massca-style option is a solid middle ground.
Related reading
- Cabinet Hardware Spacing Guide
- How to Use a Cabinet Hardware Jig (Coming soon)
- Cabinet Jig Mistakes
- DIY Handle Drilling Template (Coming soon)
- Best Countersink Drill Bit Set
- How to Drill Cabinet Door Handles Straight (No Blowout)